Tuesday, January 31, 2012

My 25 Days of Christmas Challenge! Day 21

Hi Everyone!

Thanks for joining me.  For my day 21 project I created a card using the Recollections Bright and Jolly paper pack.


This was inspired by the song "I've got so much love for you, baby".  I think the song was sang by the Temptations and hubs thinks it was from the movie the 5-Heartbeats.  If anyone knows who sings this song please let me know.

What I used...
~Recollections Bright and Jolly Paper pack
~Recollections White Card Stock
~Cricut Paper Lace cartridge (heart)
~Studio G ink
~Studio G snow globe stamp
~Studio G alphabet letters stamps
~DecoArt Twinkles

Thanks for stopping by and spending some time with me.  Until the next time..

Kelli

My 25 Days of Christmas Challenge! Day 20

Hi Everyone,

Just a few more projects to go.  Here is my day 20 project..


I love the paisley pattern in this K&Company collection

What I used...
~K&Company Yuletide paper pack
~Studio G ink pad
~Recollections Christmas Stamps
~Recollections Card Stock
~Cricut Theresa Collins Sophisticated Cartridge
~Black bling
~Lace
~Bakers twine-RAK from Krafthead
~Pearl Strand - RAK from Krafthead

Thanks for stopping by and taking a gander at what I made.

Kelli

Saturday, January 21, 2012

My 25 Days of Christmas Challenge! Day 19

Hi Everyone!

So, back on day 9 I created a page for a mini album that I made for a swap with 
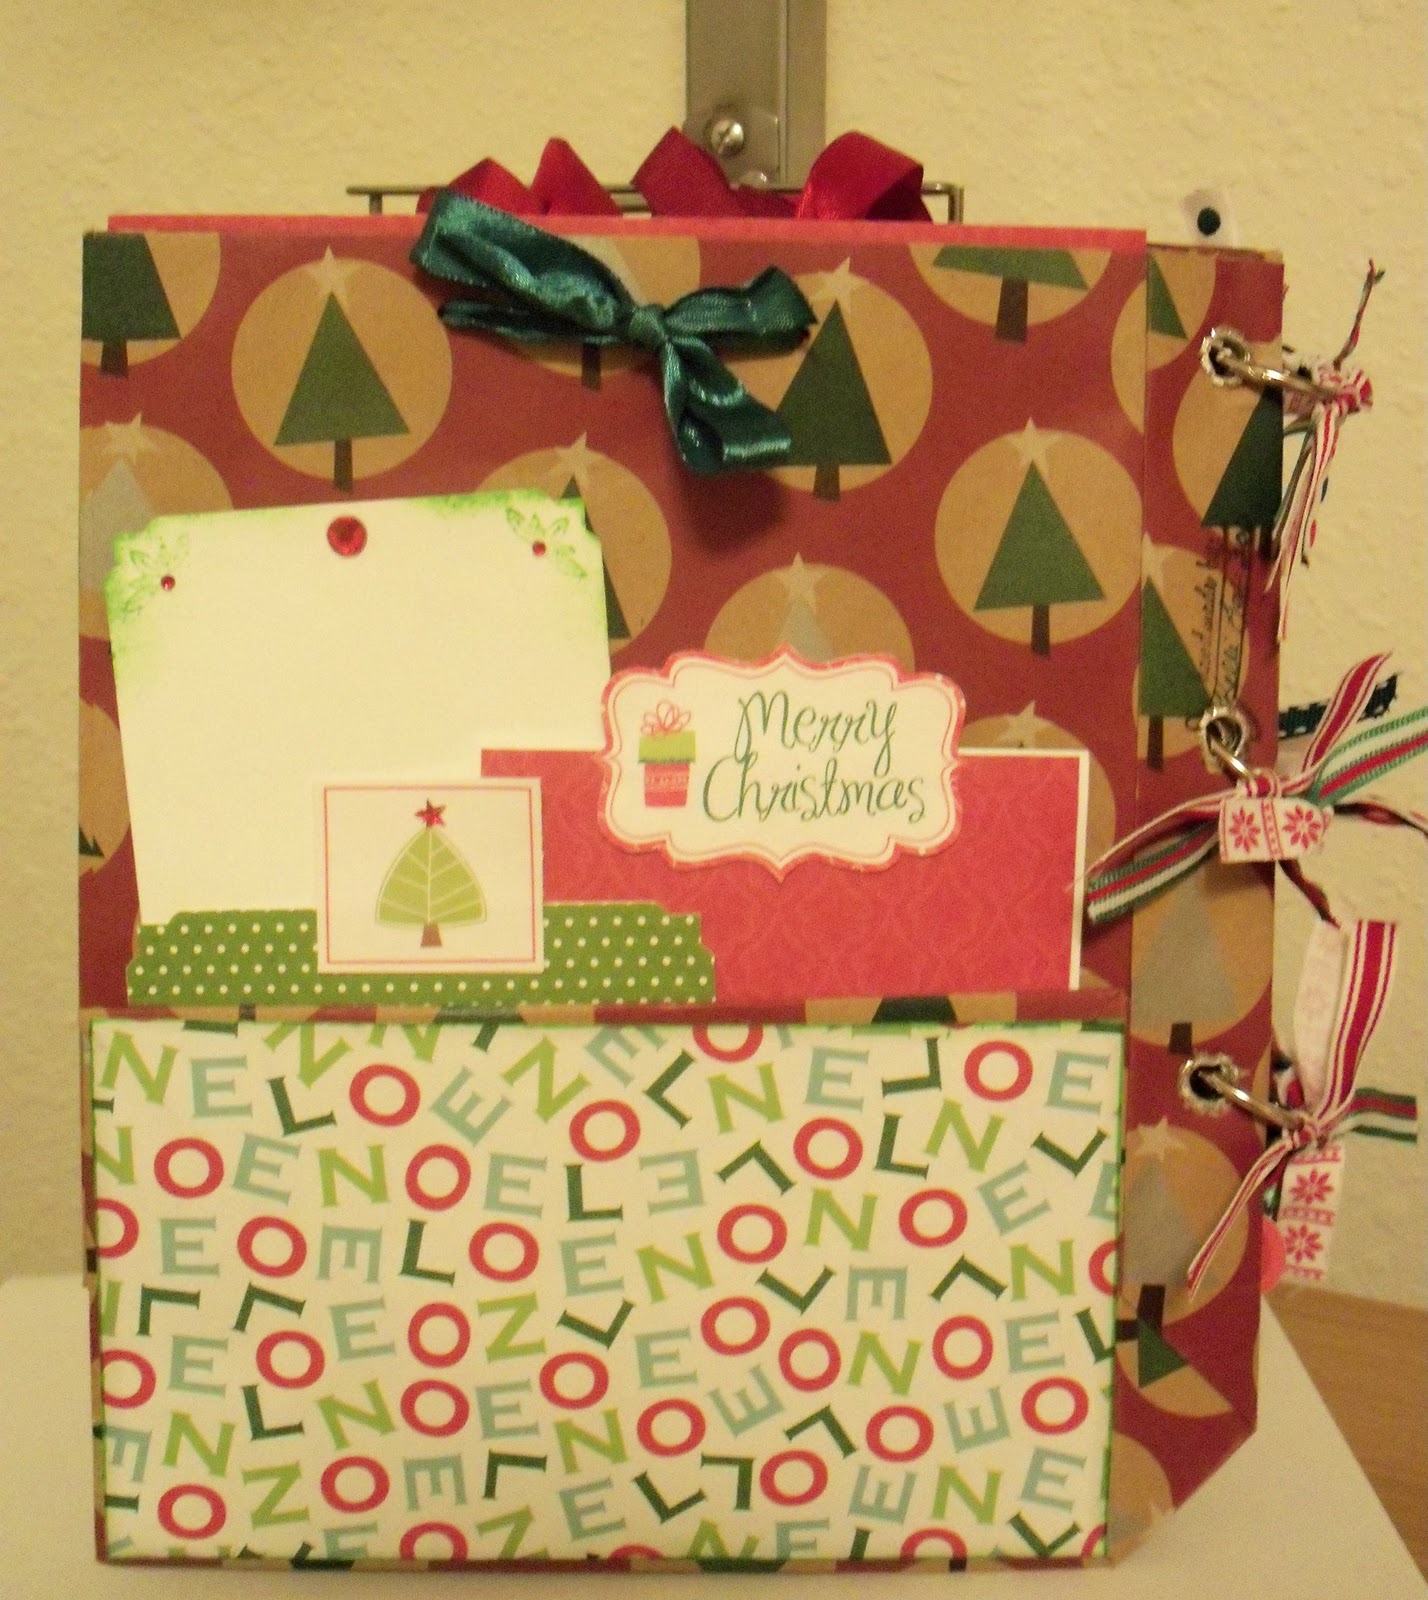
Krafthead.  Since the swap is over and she has received the album I can show you the pages that were created.  For her album I used Christmas gift bags.  I loved making this album and how it turned out. Here it is.. Keep in mind there are lots of pictures.  This is the cover and the first bag.  The striped piece that you see is actually the first of five extra large tags.


 The back of the bag has been turned into a pocket and can hold as many tags as you desire.  I chose to create 3 tags in each pocket.  I also added one of many folding photo mats.  The one on the left holds 5 phots and tucked behind it is another tag.

The tag on the right has space for 3 photos and the ribbon you see is actually another tag.

Here is the first bag sized tag.  Front and back, it is able to hold four 4x6" photos or two larger photos.

This is the third tag and the back of bag two and front of bag three.

Four photos mats, one journal spot, one blank tag and one fold out tag.  I think this is my favorite section of the album.

The winter wishes tag is the journal spot.  The fold out holds six photos.


For this bag I created a velcro pocket to place, yes, many more tags.

See the two more tags tucked inside the swing out pocket?

The back of page/bag 4 and the front of 5.  Another fold out photo mat for 5 photos.

Close up of the tags.

This is the page that I showed you in my Day 9 challenge

This fold out had the capacity to house a combination of 9 photos and journaling spots

Here is the back of the last album page/bag.  The pocket holds three tags.

Here is a close up of them.  The fold out tag is able to house 6 photo spots.

What I used...
~Recollections Bright and Jolly paper pack
~Making Memories Holiday paper pack
~Recollections white card stock
~Green & black ink pads
~Studio G pigment pink pad
~Fiskars corner punch & embosser
~Ribbon
~Craft Smart rubber stamps
~Flat back pearls and bling
~Autumn Leaves journaling stamps

I had such a blast making this album that I purchased more bags to make another one.  Stop by Krafthead's blog too see some more pictures and to see all the fantastic pieces that she makes.

Thanks for coming by to see what the next project was - I really appreciate it!!

So, I will see you on the next project.

Kelli

Wednesday, January 11, 2012

My 25 Days of Christmas Challenge! Day 18

Hi Again!

Today's project is a simple Christmas card I made using Craft Smart wood mounted stamp from Michael's
.  


I think this nutcracker is soooo cute!


What I used...
~Recollections "Bright & Jolly" paper pad
~Recollections white card stock
~Red & green card stock from my stash
~Black Recollections brads
~White gel pen
~Stash ribbon
~Black marker

I think this card turned out kinda cute!

Thanks so much for stopping by and I'll see you later for the next project!!!

Kelli

My 25 Days of Christmas Challenge! Day 17

Hi Everybody!


Today's project is a special treat that I love and my husband is quite fond of.  I just made it and he has already asked that I make more.  :D  What is this special treat you may ask?  Well...Peppermint Bark!  This treat is super simple to make!!


What you'll need to make Peppermint Bark...
~1 bag of Milk Chocolate/White Chocolate or both
~Crushed Candy Canes
~Peppermint Oil (optional)
~Cookie Sheet (I think the aluminum ones work best)
~Knife or cooking mallet


First step is to melt the chocolate.  I love the combination of white and milk chocolate together however you can use one or the other if you prefer.  The steps are still the same.


To melt the chocolate, place a pot on a low heat setting and pour in some of the chocolate.  The trick is to let the chocolate melt slowly so it doesn't burn.  Then you will want to stir the chocolate so all the pieces heat up and melt.  (I melt the milk chocolate first but I forgot to take the picture - ha ha).


Once the chocolate is melted and smooth pour the rest of the chocolate in and stir until the rest is smooth.  At this point you may want to add a few drops of peppermint oil to the melted chocolate.  Not too much, peppermint oil can be strong.

 I usually place the milk chocolate down first in a cookie sheet and spread it out.  Then place it in the freezer for just 2 or 3 minutes.  Just enough time to cool the chocolate down a bit but not long enough to make it completely solid.  I like to sprinkle some crushed candy canes on the chocolate at this point.


Then take it out the freezer and pour the white chocolate on top and spread out over the milk chocolate.


Cover the white chocolate with the remaining crushed candy canes.


And, with a spatula, press the crushed candy canes into the chocolate.  Then place the whole thing back in the freezer to completely harden.


Now that it is completely hard, with a knife, mallet, or some kind of breaking device, break the bark into smaller pieces. 


And then lastly - and in my opinion the best part - ENJOY!!!


Thanks for stopping by and I hope you give this a try.  It is a great treat for after Christmas too because you can use up all those left over candy canes.  : )


Kelli

Tuesday, January 10, 2012

My 25 Days of Christmas Challenge! Day 16

Hi!!

I am coming down to the last ten projects of my Christmas challenge. Today's project is another card..


What I used...  I used a collage of products
~Solid red card stock from my stash
~K&Company "Yuletide Designer Mat Pad"
~Making Memories Felt Poinsettia Blossoms/Fleurs Noel
~Offray Ribbon
~Recollections Christmas stamps
~Studio G ink
~Teresa Collins "Sophisticated" Cricut cartridge
~Dollar Tree doilies

Thanks for stopping by and I will see you in the next post!

Kelli

Saturday, January 7, 2012

My 25 Days of Christmas Challenge! Day 15

Hi All!

So for today's project I thought I would share a small gift for friends of Hubs and I.  Nothing major just two etched glasses...

First I cut out their initials

Then used etching cream

 And when all was said and done this is what the glasses looked like

I hope they like them.  I had such a fun time making them!!


What I used..
~Glasses
~Etching Cream
~Stencils


Thanks for stopping by and I will see you in the next blog.  :D

Kelli


Monday, January 2, 2012

My 25 Days of Christmas Challenge! Day 14

Hi!!

For my Day 14 project I decided to alter a $1 store tree skirt find.  The first thing I did was to use the skirt to create a pattern.  I used printer paper, taped it together and create a paper pattern so that I could use the pattern to create another skirt that will match next year's color scheme.  I love the snowflakes on this felt skirt but I thought it need a little sparkle and a finished edge.   So I took some silver glitter glue and went over each snowflake.  Then once the glue dried I sewed white lace on bottom of the skirt.  I think it's a cute way to spice up the skirt.


I think the finished project is really sweet!

What I used...
~DecoArt Twinkles
~Sewing Machine
~Red & White Thread
~White eyelet lace

Thanks for stopping by and I will see you in the next project!

Kelli
Favorite Favors

Sunday, January 1, 2012

My 25 Days of Christmas Challenge! Day 13

Hi Eveyone!!

Today's project is a big one and I look forward to it each year!  the decorating of the Christmas tree!!  Each year a color scheme is chosen and all the decorations that have those colors are used.  This year the color scheme is Red & White.  The colors used represent the blood and the purity of Christ.  Hubs saw snowflakes everywhere we went this year and he wanted to incorporate snowflakes into the theme; how could I say no to him. So here is our tree for Christmas Tree for 2011...


This tree cost a total of $20 to decorate.  Since we moved a lot of our belongings are still in storage, this includes our Christmas decorations.  So we had to start from scratch.  We found the lights and the crocheted angel at a thrift store and all the ornaments, candy canes, garland and flowers came from the Dollar Tree.  I have been placing cards in my tree for years.  It is a tradition that I have begun since the first tree that I purchased on my own.  I placed the cards in the tree because I didn't have a mantel to put the on and the tradition was born.  It is going to be sad taking the tree down, as it is every year, we take it down the day after New Years, but I really like this tree.

Thanks for stopping by and I will see you in the next project!

Kelli
Favorite Favors